Setting up your GitHub Classroom assignment
After deploy succeeds and post-push validation passes, the Classroom setup guide unlocks. This article walks the GitHub Classroom new-assignment wizard end-to-end with every value pre-filled, including the critical protected-paths list and why you should NOT configure Classroom's own autograder.
Written By Alan Gandy
Last updated 3 months ago
After your assignment deploys and the post-push validation banner turns green, the Create GitHub Classroom Assignment card appears on the Deploy step. This is where you wire the new GitHub repo into Classroom so students can join via an invite link.
This article walks through the Classroom assignment-creation wizard step by step, with every value you need to enter and why it matters.
Two ways to do this
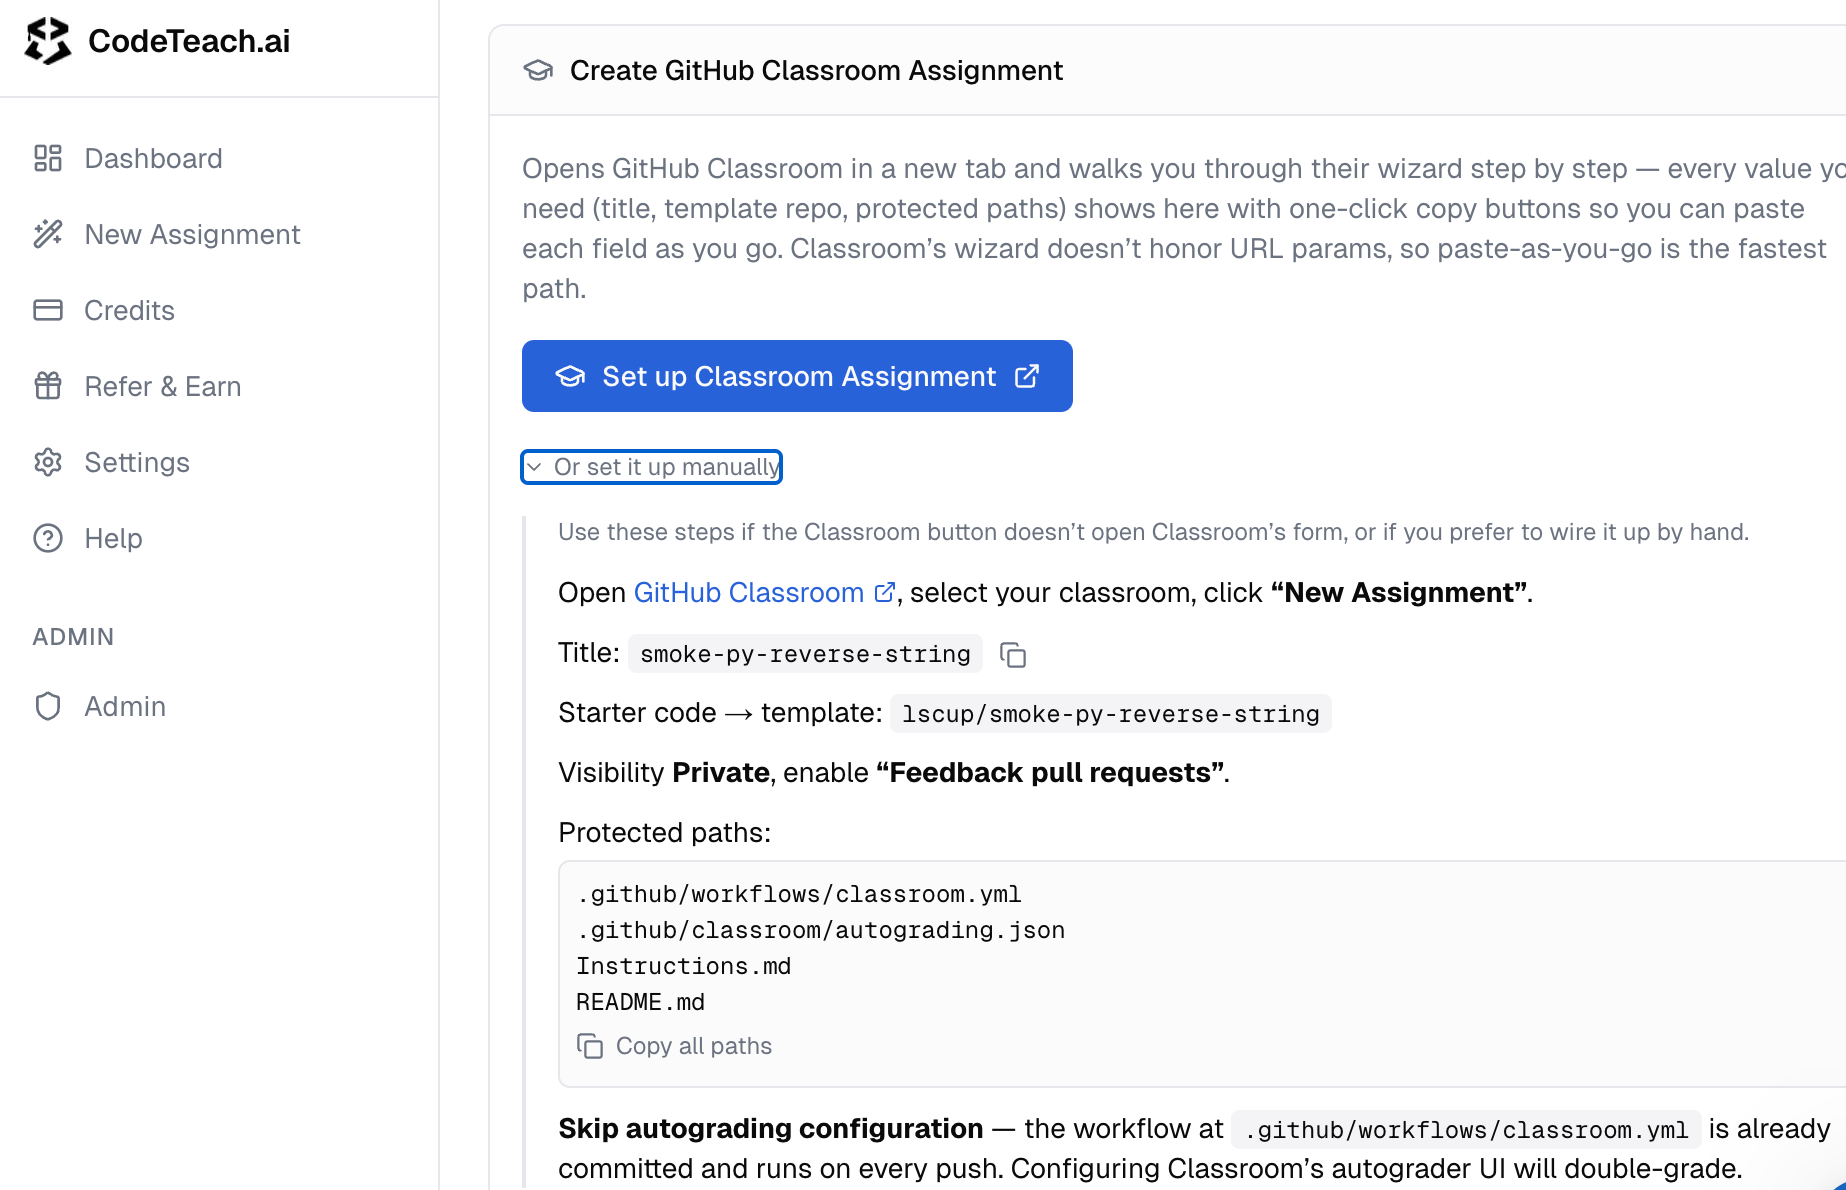
Set up Classroom Assignment (recommended)
Click the big blue Set up Classroom Assignment button. CodeTeach opens a modal that:
- Asks you to pick which classroom (if you have more than one in the org)
- Pre-fills the title, template repo, and protected paths
- Opens GitHub Classroom's new-assignment form in a new tab
- Shows you a copy-paste-ready cheat sheet with every field's value
You then paste each value into Classroom's form as you go. (Classroom's wizard doesn't accept URL parameters, so paste-as-you-go is the fastest path.)
Or set it up manually
Click the Or set it up manually disclosure on the Classroom guide card. The lettered steps below match GitHub Classroom's actual UI tabs in order. Use this path if the picker modal doesn't work for some reason, or if you want full control over each field.
What each Classroom field should be
Title
Whatever you want students to see in their list of assignments. The wizard pre-fills the assignment's title from your CodeTeach session (defaults to the repo name if you didn't set one). Edit if you want a friendlier display name — Lab 5: Word Frequency Counter reads better than 1436-lab5-words.
Starter code → template repository
The full path to the repo CodeTeach just pushed: your-org/your-repo-name. CodeTeach pre-fills this and shows it in a copy-button box.
Visibility
Private. Always. Public template repos let anyone copy the solution branch. There is no situation where Public is the right answer.
Feedback pull requests
Enable this. It creates a PR on each student submission with the autograder feedback inline, which is dramatically better than just a numeric score. Students see exactly which tests failed and which lines need attention — much easier to debug than a raw 60/100.
Protected paths
This is the most important field, and the easiest to skip.
GitHub Classroom can prevent students from editing specific files. CodeTeach pre-populates the protected paths with everything an autograder-savvy student would otherwise edit to "win" without doing the work:
.github/workflows/classroom.yml— the autograder workflow (without protection, students can comment it out).github/classroom/autograding.json— the test definitions (only present if you have tests).github/scripts/normalize_notebook.pyandextract_notebook.py— for jupyter assignments onlyInstructions.md— the assignment text (without protection, students can mark off TODOs without doing the work)README.md— generic orientation; protect to prevent confused students from dropping their own README
The CodeTeach modal includes a Copy all paths button — paste the whole list into Classroom's protected paths field at once.
Skip the autograder configuration in Classroom
Don't configure GitHub Classroom's built-in autograder. CodeTeach already wrote the workflow file (.github/workflows/classroom.yml) that runs on every push. Configuring Classroom's autograder UI on top will double-grade — students see two scores, the workflow runs twice, things get confusing.
Skip the autograder section in Classroom's wizard entirely. The grade students see in Classroom comes from CodeTeach's workflow.
After Classroom creates the assignment
GitHub Classroom gives you an invite URL that looks like https://classroom.github.com/a/abc123xy. Share this with students — they click it, accept, and Classroom forks the template into a private repo for them.
Save the invite URL in CodeTeach (optional)
Below the Classroom setup section is the Classroom Invite URL input. Paste the invite URL here and click Save. CodeTeach stores it with the session so you can find it later from the Dashboard. Useful if you'll be sharing the URL multiple times across multiple semesters.
Common Classroom setup pitfalls
"Template repository not found"
Classroom can't see the repo. Causes:
- The repo isn't in the same org as your classroom — fix: redeploy to the right org
- The repo isn't marked as a template — fix: go to the repo's Settings page and check "Template repository"
- You're logged into Classroom as a different user than the one whose CodeTeach App you installed — fix: log out and back in to the right account
Students see the solution
The repo's solution branch was somehow visible to students. Causes:
- Repo is public (it should be private)
- A student was added as a collaborator with read access (rare — Classroom doesn't normally do this)
If this happens, immediately delete the assignment in Classroom, delete the repo in GitHub, fix the visibility, and redeploy.
Autograder runs twice / gives weird grades
You configured Classroom's built-in autograder in addition to the workflow CodeTeach pushed. Open the assignment in Classroom, edit it, and remove all the autograder configuration. CodeTeach's workflow handles grading.
Invite URL doesn't work for students
- "Repository creation failed" → Classroom couldn't fork the template. Usually a permissions issue with the org. Verify Classroom has admin access to the org.
- "You don't have access" → student is signed in to GitHub but not enrolled in your classroom. Send them to the classroom's Students page first.
Differences for Jupyter assignments
For jupyter-python assignments, CodeTeach also pushes .github/scripts/normalize_notebook.py and extract_notebook.py. These are pre-test hooks that convert notebooks to plain Python before the autograder runs (because the grader doesn't natively understand .ipynb). They're already in the protected paths list — don't remove them.
Students can submit work as .ipynb and the grader still sees plain Python.
Telling students what to do
After Classroom creates the assignment, send students:
- The invite URL from Classroom
- A short note like:
Click the invite URL, sign in with GitHub, accept the assignment. GitHub will create a private repo for you. Clone it to your laptop, edit the starter code to fill in the TODOs, commit, and push back to GitHub. Each push triggers the autograder — check the Actions tab on your repo to see your latest grade. Push as many times as you want before the deadline; only your latest score counts.
That's it. Students don't need to know anything about CodeTeach.
Where to go next
- Done with setup, ready to share the invite URL with students? → Just paste it in your LMS or course email. CodeTeach's job is done.
- Post-push validation failed before you got here? → Reading the post-push validation banner explains how to fix the GHA-vs-replica drift.
- Want to deploy a second assignment? → Back to the dashboard and click New Assignment.